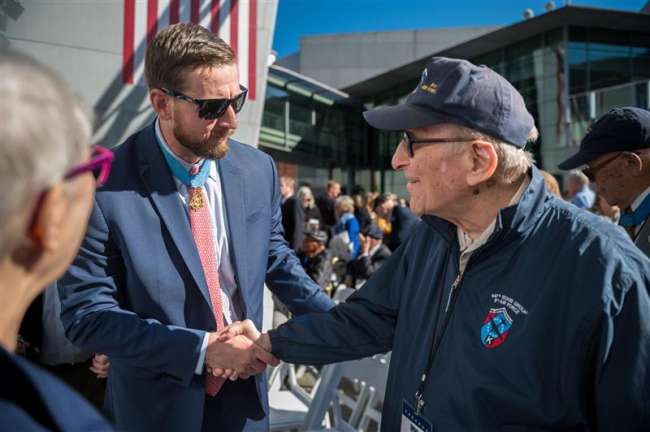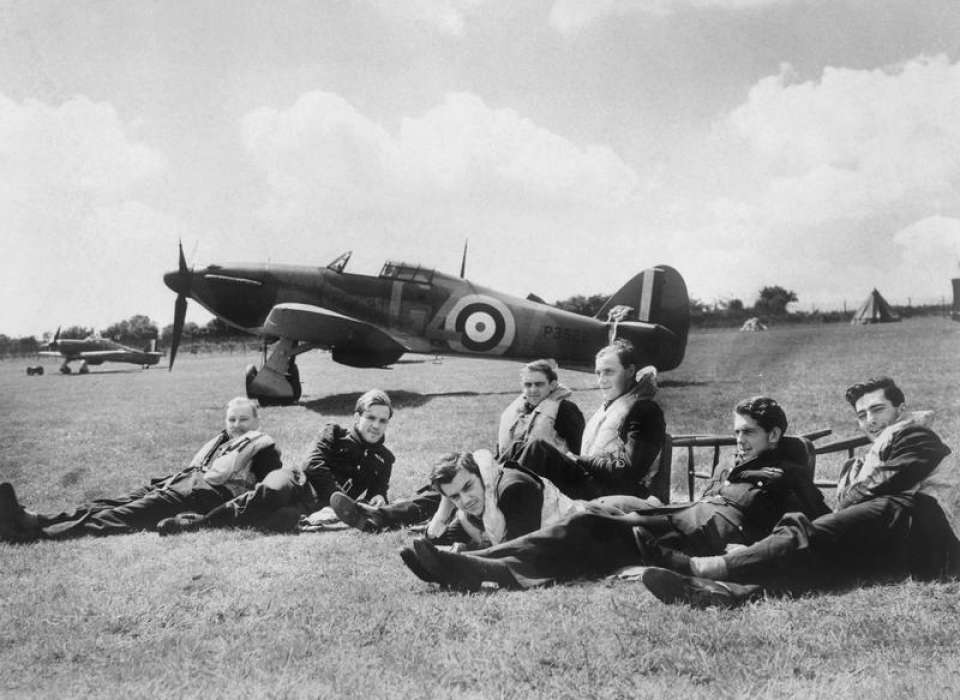
Top Photo: Pilots of 'B' Flight, No. 32 Squadron relax on the grass at Hawkinge in front of Hurricane Mk I P3522, GZ-V. July 29, 1940. Source: Imperial War Museum collection
During the Battle of Britain in the summer of 1940, the Royal Air Force (RAF) was locked in an existential fight with Nazi Germany’s Luftwaffe. In the heat of the campaign, Prime Minister Winston Churchill quipped in a speech before Parliament: "Never in the field of human conflict was so much owed by so many to so few.” As was Churchill’s gift with words, this statement served as inspiration to a nation standing alone against the Nazi onslaught. The fighter pilots of the RAF flew in their Supermarine Spitfires and Hawker Hurricanes against a well-seasoned and experienced Luftwaffe in their Messerschmitt Me 109s and 110s. These German fighters flew cover for Heinkel He 111, Dornier Do 17, and Junkers Ju 87 and 88 bombers as they raided southern England in preparation for the Wehrmacht’s planned amphibious assault, Operation Sea Lion. This aerial battle was unlike any campaign before and continues to provide a stirring example of resolve, doggedness, and defiance in the face of aggression.
This campaign is often painted as a kind of David-and-Goliath struggle, with the RAF as the diminutive David taking on the Goliath of the Luftwaffe. With the Nazis enjoying a victory over Poland, and more impressively, rolling over the French in a matter of weeks, England stood alone against what appeared to be an invincible Wehrmacht and Luftwaffe. But after losing approximately 1,000 aircraft in the futile Battle of France, it appeared that the RAF was now a hollow force with little reserve or combat power.
Comparatively speaking, however, a review of the actual data reveals that RAF pilots weren’t so “few.” In addition to pilots, Britain also had plenty of reserve and industrial strength to ensure RAF Fighter Command had enough aircraft during the campaign. While mass and quantity certainly have a role to play, the Brits also had other assets and procedures that helped tip the scales of victory. Historically, a synergy of events and considerations often conspired to make the difference once combat was joined. The same is true in the Battle of Britain. While the outcome of the battle was not preordained and was indeed a struggle for the British people, it is important to set the historical record straight regarding the RAF’s David fighting the Nazi Goliath.
A Regenerated Fighter Command
As the battle began in July 1940, Fighter Command’s Air Marshal Sir Hugh “Stuffy” Dowding had approximately 768 aircraft under his charge after the debacle in France. Of that number, only 520 were still considered battleworthy. While certainly a paltry number given the large airspace the RAF had to cover over the British Isles, this situation drastically improved over the next few weeks. By the time the Germans fully launched their offensive in early August, the number of RAF fighters available almost doubled to just over 1,000. Throughout the summer, British aircraft manufacturers produced approximately 500 fighters per month, more than double the number estimated by German intelligence. In addition to this production capacity, the RAF had another 400 planes in storage ready for use. As a result, in the first few weeks of the campaign a regenerated Fighter Command had a fleet of some 1,400 airframes.
Conversely, during this same period, the Luftwaffe single-engine fighters numbered just over 1,000 with approximately 800 ready for combat. The vaunted German Me 109 was a formidable and well-built machine capable of dealing with the RAF fighters. At this time of the war, monthly Luftwaffe fighter production was approximately 300 airframes. However, German production capacity had yet to fully mobilize and failed to produce the large number of 109s required to overwhelm Fighter Command. By September 7, the Luftwaffe was down to just 533 fighters and temporarily dipped as low as 275. Given these comparative numbers, the RAF held a significant numerical advantage in both planes available and production capacity.
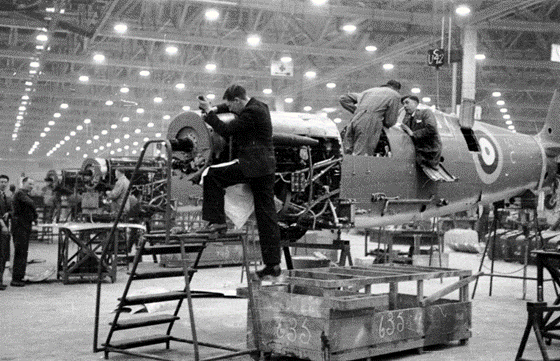
Early Supermarine Spitfire production. Despite combat and operational losses, the RAF was able to produce fighter aircraft in roughly equal numbers. (RAF Museum photo)
But how did Fighter Command increase its numbers during the summer of 1940 and maintain a sizable fighter fleet throughout the campaign? This was addressed even before the battle was joined. In view of German aggression, many British ministries considered the requirement for increased armament production with plans already in place. To prevent their possible destruction, some ministries were moved out of London and dispersed across the country.
At the Harrogate Grand Hotel in northeast England, the Air Ministry staff drafted and implemented a long-term plan for aircraft production. Working with the Ministry of Aircraft Production, the “Harrogate Program” arranged for and set a production quota of over 3,000 fighters per year. With factories and facilities established throughout the islands, the program proved successful, resulting in the production of over 4,200 fighters in 1940. More importantly, many of these aircraft were produced during the campaign and helped fighter squadrons maintain their authorized complement of aircraft. This was not done overnight but was accomplished through a deliberate and well-planned effort to maintain an air force given the emerging threats. The maintenance of Fighter Command’s numbers with the replacement of new Spitfires and Hurricanes rests largely on this often-overlooked industrial capacity.
The RAF Pilots
While producing planes is one thing, the RAF required trained pilots to fly its fleet of fighter aircraft. During the campaign the RAF needed to maintain a cadre of approximately 1,400 fighter pilots. Like building the aircraft themselves, this required a deliberate process for the replacement of pilots and a personnel system responsive to combat losses. Fighter pilot training occurred at designated Operational Training Units (OTUs) after a newly winged aviator completed flight school. Given the situation, in the summer of 1940 the RAF revamped its training programs and added three additional fighter OTUs. Existing fighter OTUs usually produced only 39 pilots every two weeks, but with these additions the OTUs collectively produced approximately 115 pilots every two weeks—almost a threefold increase. With an overall 10 percent loss rate during the campaign, Fighter Command was able to keep sufficient pilots in its ranks. However, as the summer turned into fall, the training process began to lag behind the combat losses. Fortunately, during this same period, the Germans began to curtail their aerial offensive.
In addition to British pilots, Fighter Command also enjoyed the presence of exiled Polish pilots eager to seek battle, along with a mix of Canadian, Czech, Belgian, French, and American volunteers. More than 275 fighter pilots from conquered continental powers helped augment Fighter Command ranks. In addition to these numbers, another advantage for the RAF was that any unfortunate pilot bailing out of his fighter would set down in his parachute on home turf. With survival rates of pilots bailing out of their stricken fighter at 60 to 70 percent, the pilot could eventually return to his squadron barring serious injury.
The Germans did not have that luxury: Any airman downed over the Isles was out of the war permanently. Much like the size of their fighter force, the Luftwaffe maintained approximately 1,200 single-engine pilots of which 900 were readily available. At this stage of the war, the German war machine was not built for a war of attrition and did not have the capacity for a surge or a large-scale reserve training requirement. While not necessarily a factor during the summer of 1940, this would eventually haunt the Luftwaffe as the war progressed. However, during the campaign, German loss rates were relatively lower than the British and, given their output of replacements at the time, the Luftwaffe kept up its numbers. But comparatively speaking, the RAF not only had more pilots during the campaign but could absorb losses easier than the Luftwaffe.
Integrated Air Defense
While the number of planes and pilots were certainly relevant and important, the management of the forces involved was a key factor in the RAF success. Airpower during the 1930s was viewed primarily as inherently offensive with little thought given to air defense. Going against the prevailing thought, the British devised one of the world’s first integrated air defense systems. Key to this integrated defense was the “Chain-Home” radar network built in 1939 that included some 21 towers ringing the British coastline. This rudimentary system was able to “sight” an incoming aircraft at ranges up to 200 miles but was more effective at only 80. Regardless, finding inbound formations at the lower range still provided plenty of time to scramble a squadron to meet an incoming raid. While Chain-Home radar was able to detect aircraft at higher altitudes, it could not detect those coming in at less than 1,000 feet. To cover this gap, the RAF also built “Chain-Home-Low” radars that scanned lower altitudes but only up to 30 miles. Interestingly, the Germans were aware of the RAF radar system but had no real understanding of its capabilities or coverage and failed to knock it out. The few attempts to hit the radar masts resulted in only minor damage that was easily repaired.
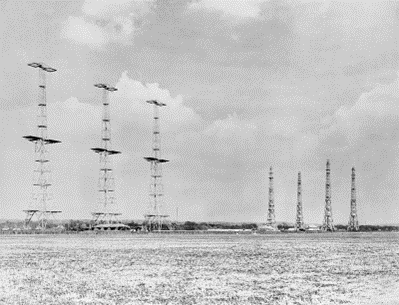
Royal Air Force “Chain-Home” radar masts located at Sussex England. These radars could see incoming German aircraft as far as 200 miles out and provided important early warning information for Fighter Command. (Wikimedia)
The RAF also employed 30,000 trained ground observers at over 1,000 locations scattered throughout the country. Staffed by civilian volunteers, the observer stations were equipped with a grid map, colored markers, a telephone line, and an altitude estimator. (One uniquely British requirement for the observation station was that it must retain a constant and reliable tea-making capability!) Such posts helped validate and triangulate incoming raids with the Chain-Home radar feeds. While observation posts were of limited use during inclement weather and at night, they remained an important part of the defensive network.
The British also set up a wireless radio interception station at Woodhead Hall near the town of Cheadle. Disguised as a meteorological station, RAF radio operators there listened in on careless and slack German aircrew radio communications. Exercising poor radio discipline, Luftwaffe transmissions often provided a wealth of information regarding altitude, heading, and target location. Given this radio intelligence, combined with radar information and observer reports, the RAF was able to accurately locate and track German formations once they took off and could effectively monitor them during their entire mission sortie.
With this wealth of enemy information, the RAF then exercised effective command and control of the aerial battle. As data came in from multiple sources, a centralized command and control system coordinated Fighter Command activity. At Bently Priory in the London suburbs, the RAF established what was referred to as the “Filter Room.” Here all the available information on incoming raids was collected, assessed, and then plotted on a large map. Placed horizontally, the map was divided into grids and depicted fighter group boundaries, airfields, and areas of responsibility. Markers were placed on the map symbolizing incoming raids and fighter intercepts. Members of the Women’s Auxiliary Air Force (WAAFs) received the latest information available on all air movements and used croupier’s rakes to move annotated markers representing the German or RAF formations. Marker annotations included estimated strength of the raid and a color code that indicated when the marker’s information had last been updated. From the Filter Room orders were issued to sectors or groups to launch assigned squadrons for an interception. However, the Filter Room was responsible only for the initial warning and assignment, the tactical conduct of the final interception was left to commanders on the scene.
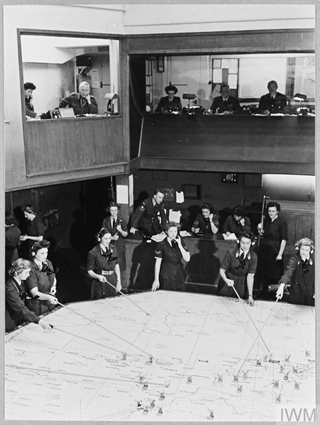
Women’s Auxiliary Air Force (WAAF) personnel move markers on the plotter map during the Battle of Britian. Such functions were key in developing and managing situational awareness of the larger aerial battle. (Imperial War Museum photo)
The command and control of RAF fighters did not end there. Unlike the Luftwaffe, British aircraft were linked electronically to the Radio-Telephony Direction Finding (R/T-D/F) network. With a series of relays in place, this system allowed RAF aircraft to receive the latest information on inbound raid locations, altitudes, and composition. This gave a squadron or group commander a decisive edge. The Luftwaffe had no such capability and once a German bomber force took off for a given target, it received no communications or guidance from German Air Fleet (Luftflotte) or Flying Corps (Fliegerkorps) headquarters. Unlike the RAF, the Luftwaffe had no dynamic tasking capability. As a result, German formations flew into battle with little to no idea as to the location of RAF fighters and had no way to command and control the larger air battle.
The British however could manage the air battle, directing its assets to intercept the Germans at the correct time and place. This made for the effective management of Fighter Command’s pilots, planes, and other resources. Not only was this system more efficient, but it made the most of the assets available while reducing force fatigue. With this system, RAF crews could remain on the ground without having to constantly patrol the empty skies looking for a potential raid that was not there. While aerial patrols did take place, there was no requirement to maintain a significant and continued presence in the air. This substantially reduced maintenance on aircraft, avoided pilot fatigue, and minimized other support requirements.
The End of the Battle of Britain
Such operational and strategic factors set the stage for the tactical fight. The aerial melee continued for weeks until the campaign finally petered out in late October, when the German aerial offensive slowed to a crawl. With this the threat of a cross-channel amphibious assault diminished. The factors addressed here set up the chess board allowing the skilled and resolute RAF aircrews to check the Luftwaffe’s offensive. Tactical comparison of airframe capabilities and performance certainly had a role to play. However, the RAF was in a much better position to defend the United Kingdom. While these factors along with others helped determine the outcome, the epic fight was less a David-and-Goliath struggle, but rather one determined by effective management, strategic planning, and the efficient integration of national assets. The outcome during the late summer of 1940 was not certain and fate of the European war indeed hung in the balance, but the foundations of the British victory were largely in place.
References:
- Buckley, John F. The Royal Air Force: The First One-Hundred Years. Oxford University Press, Oxford. 2018.
- Bungay, Stephan. The Most Dangerous Enemy: A History of the Battle of Britain. Aurum Press, London, 2009.
- Overy, Richard. The Battle of Britian: The Myth and the Reality. W. W. Norton and Co, New York, 2002.

John Curatola, PhD
John Curatola is the Samuel Zemurray Stone Senior Historian at the Jenny Craig Institute for the Study of War and Democracy.
Cite this article:
MLA Citation:
APA Citation:
Chicago Style Citation: