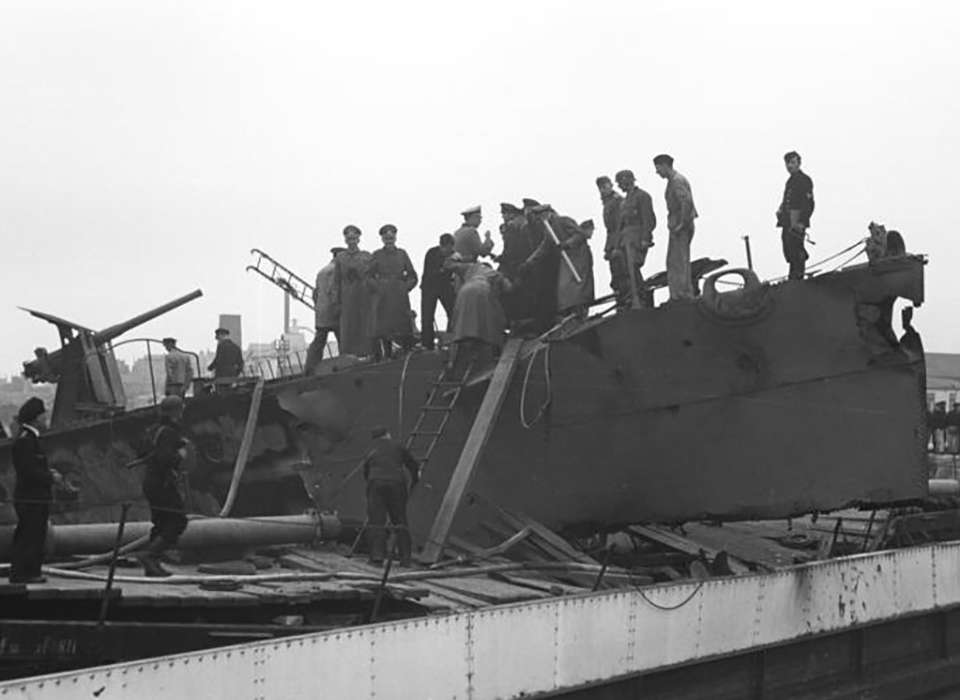
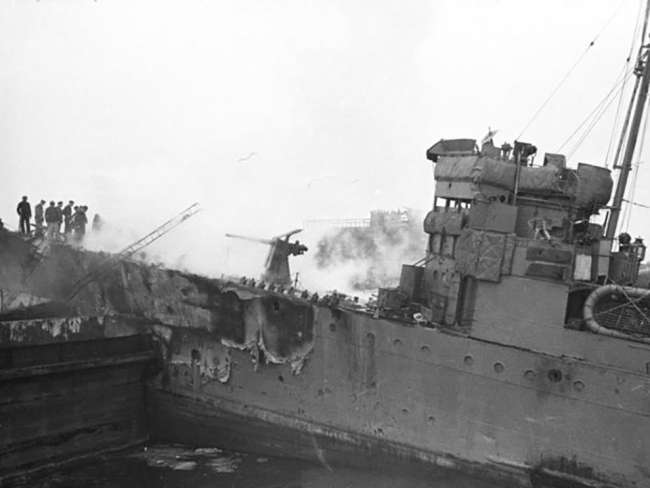
Top Image: HMS Campbeltown wedged on the dock in St. Nazaire. Bundesarchiv, Bild 101II-MW-3724-16 / Schaaf / CC-BY-SA 3.0
The 1942 raid on St. Nazaire, known as Operation Chariot, is a timeless example of the remarkable things that can be achieved when a brilliant but audacious plan is matched with individuals of uncommon valor. When Sergeant Thomas Frank Durrant manned his fully exposed WWI Lewis machine gun in the face of withering fire, he risked his life to protect his comrades and advance their mission. He was wounded repeatedly but continued to fire his weapon, inspiring his fellow commandos to push on.
Sgt. Durrant is the only Victoria Cross recipient to receive the honor for valor by a commando during a naval engagement. He also bore the rare distinction of being one whose citation for heroism was recommended by the enemy officer who ultimately captured his position.
“For great gallantry, skill and devotion to duty when in charge of a Lewis gun in HM Motor Launch 306 on the 28th March, 1942.”
Citation for the Victoria Cross awarded posthumously to Sergeant Thomas Frank Durrant
In A Bold Strategy: The British Raid on St. Nazaire, we covered the planning and naval operation that defied odds and landed elite British commandos in and around the port of St. Nazaire in the early morning hours of March 29, 1942. Part II sets forth how the Royal Navy and the Winston Churchill commandos were able to disrupt the harbor facilities and the resulting fate of the raiders, once their carefully planned evacuation route was cut off.
As the Campbeltown shuddered to a stop, she was firmly wedged atop the great caisson gates of the St. Nazaire dry dock entrance. Lt. Commander Stephen Beattie and Lt. Nigel Tibbits took additional steps to disable the ship so that the old destroyer could not be easily moved by the Germans. Campbeltown’s final mission completed, her Royal Navy crew moved to a waiting motor gun boat.
The plan called broadly for the commando teams aboard Campbeltown to compromise the critical infrastructure that controlled the dry dock while the remaining commandos, who had sailed in on the dozen trailing motor launches, landed to pursue additional mission objectives, including securing the disembarkation point on a jetty near the lighthouse known as Old Mole.
Under the leadership of Lt. Col. Charles Newman, the commandos were assigned to teams of between three and 14 troopers, with each team focused on assault, protection, or demolition. Keenly aware that they would be severely outnumbered by German defenders, Newman put a premium on balancing firepower with stealth and speed.

The commando assault and protection teams were heavily armed with Thompson submachine guns, Bren guns, fragmentation grenades, mortars, and smoke bombs. The demolition group members each carried a single Colt .45 sidearm plus a rucksack with 50 to 90 pounds of explosives and fuses.
Mindful that they would be moving from various landing points and attacking multiple targets in the dead of night, they used blue flashlights and painted their equipment straps in reflective white. Newman established “war weapons week” as the challenge password and “Weymouth” as the reply, on the assumption that the Germans would stumble on the pronunciation of the “W.” In a nod to tradition, Captain Donald Roy led his Scots into battle wearing their regimental kilts.
Even before Campbeltown came to a complete stop, the British commando detachments began scrambling over her sides. Although many had been wounded during the flotilla’s run up the Loire Estuary, they carried on with stunning speed.Tasked with neutralizing the gun emplacements protecting the area around the dry dock caissons, Captain Roy and Lt. John Roderick were the first to step off with their assault teams. Behind them, Campbeltown’s other commando teams quickly disembarked and identified their assigned targets, including the main pump houses at the far end of the dry dock. The pump houses controlled the water level in the dry dock and the destruction of one or both was vital to disabling its operation.
With Captain Roy’s assault team providing cover, Lt. Stuart Chant and his demolition team breached the pump house that serviced the main gate of the dry dock. They had studied blueprints provided by the French prior to the mission and trained on a nearly identical structure at the King George V dock in Southampton. Their training included finding their way through the three-story structure in pitch black, planting their explosives in the complex and directly on the vital pump systems before escaping in a few short minutes. Before their training was completed, the team could complete it blindfolded.
Chant was wounded during the run in and again during the assault, but he pressed on and continued to lead his team as they placed 40 pounds of explosives on the massive pumps. The commando assault teams outside kept the German defenders pinned down and on the defensive. Chant would suffer shrapnel wounds to a knee, his arm, and both hands. He set the 90 second fuses and joined his team as they hobbled up the stairwell to safety, exiting the structure moments before the Pump House was reduced to rubble. Almost simultaneously, a second team, under the command of Major Bill Copland and led by Lt. Curran Purdon, was attacking the North Winding House which controlled opening and closing the internal north gates of the dry dock. Soon it too was reduced to scrap metal and rubble.
Other commando teams from the Campbeltown moved to attack a second pump house servicing the northern gates of the dry dock and the south Winding House. Both objectives were destroyed in short order, but German reinforcements were arriving, and their defense of the harbor became more coordinated and deadlier. So, within minutes of the Campbeltown slamming into the caisson gates, the British commando teams had successfully completed the primary objectives of Operation Chariot by quickly destroying the irreplaceable pieces of heavy equipment and machinery that were essential to the operation of the St. Nazaire dry dock.
The commando teams arriving on the 12 motor launches that trailed behind Campbeltown, were feeling the full effect of the German defensive onslaught. Without armor, the mahogany-hulled motor launches and their exposed auxiliary fuel tanks were vulnerable targets for the German guns. The estuary adjacent to Nazaire was riddled with their wreckage and burning fuel.
-

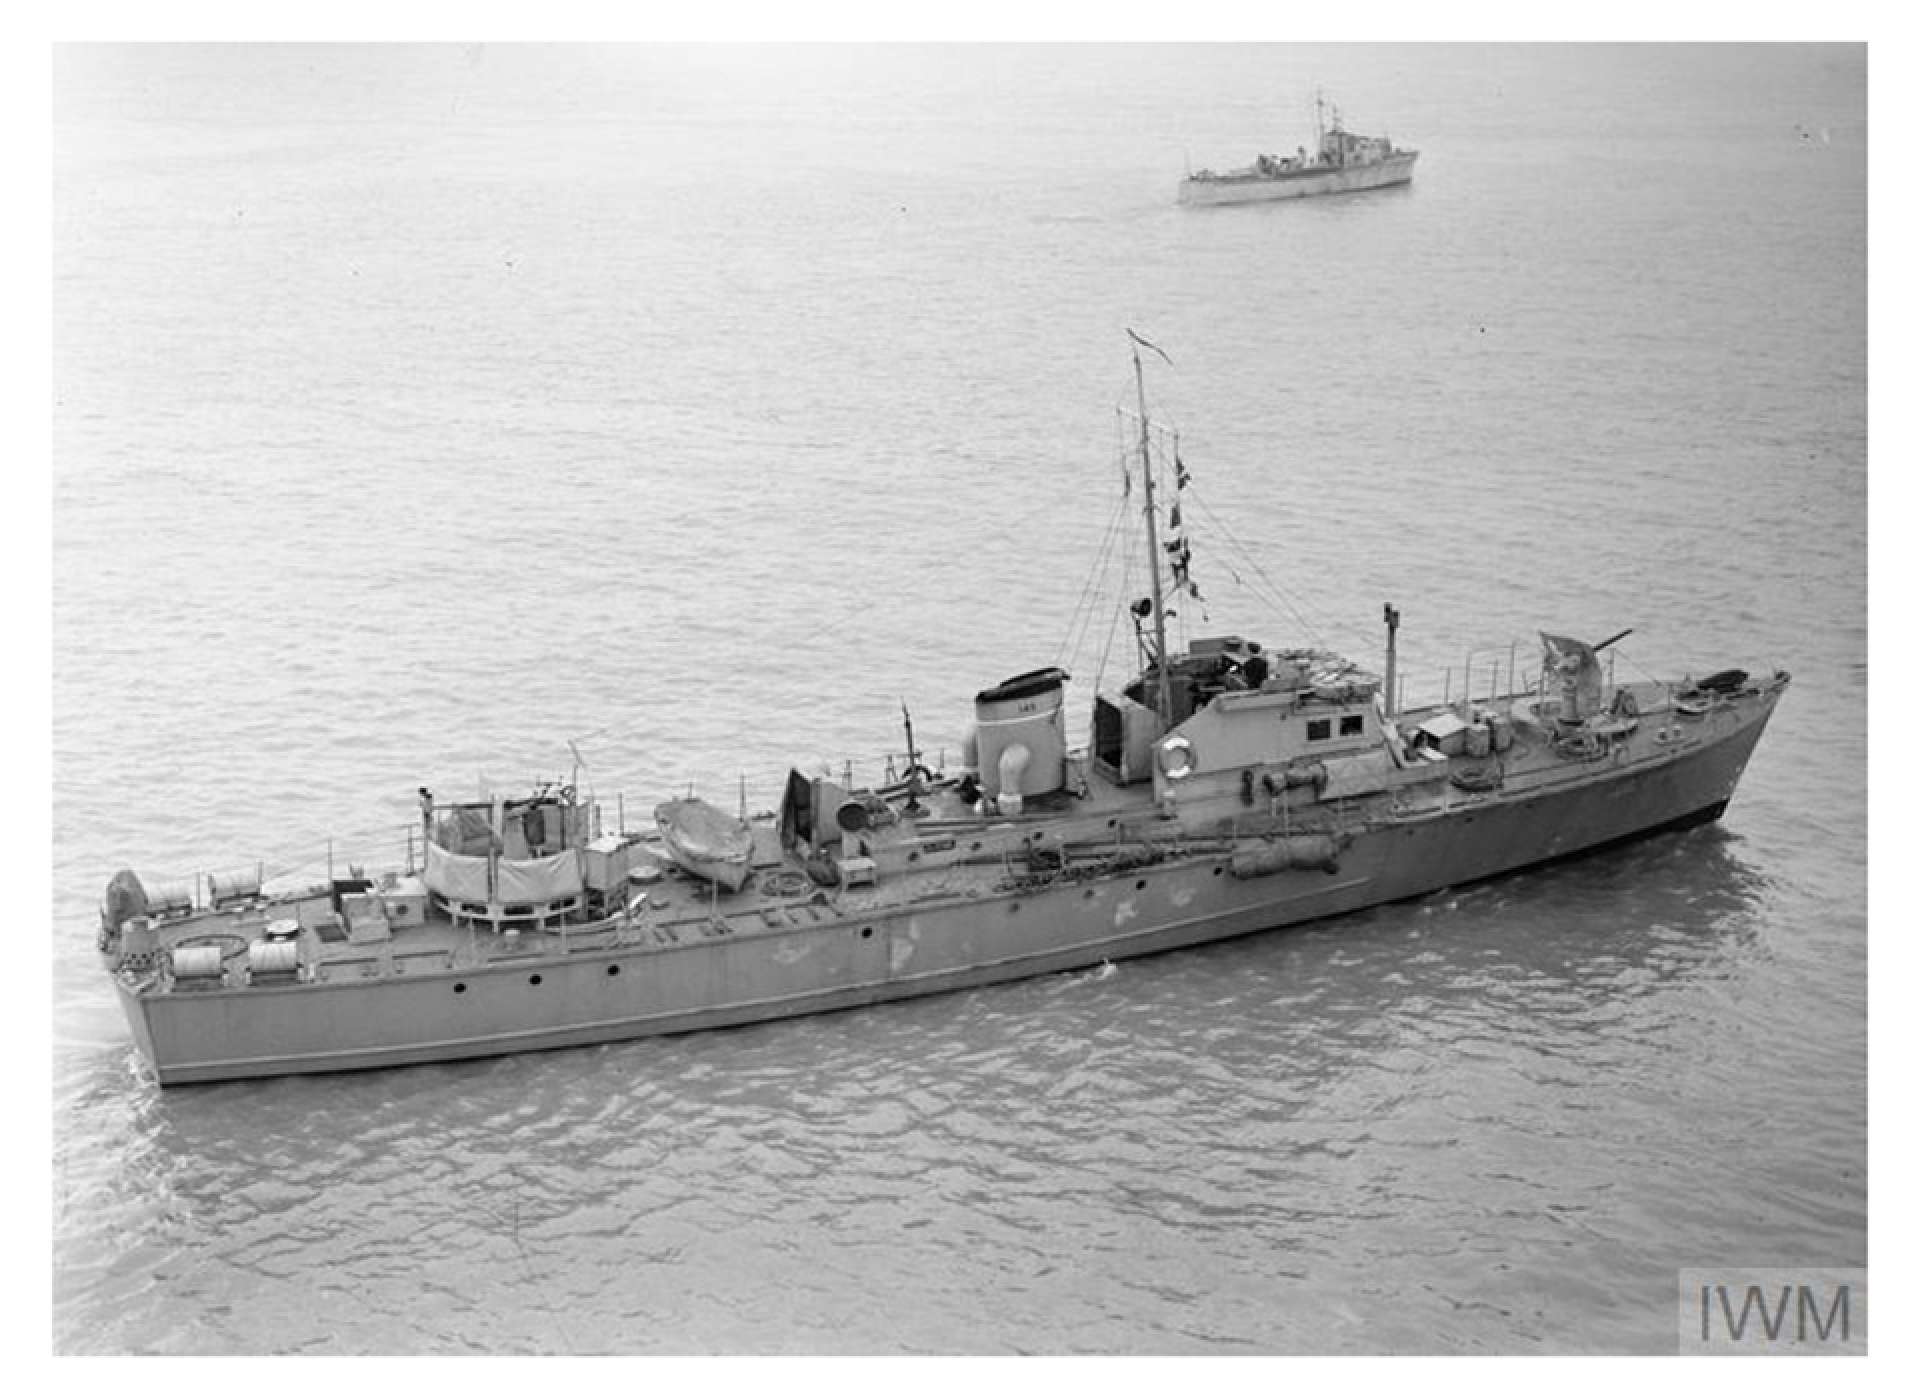
A British motor launch, of the same type used in the raid on St. Nazaire. Image from the Imperial War Museum © IWM A 13626a.
-
A British motor launch, burning and sunk in the harbor. Only three of the launches used survived the raid. Bundesarchiv, Bild 101II-MW-3717-12A / Kramer / CC-BY-SA 3.0
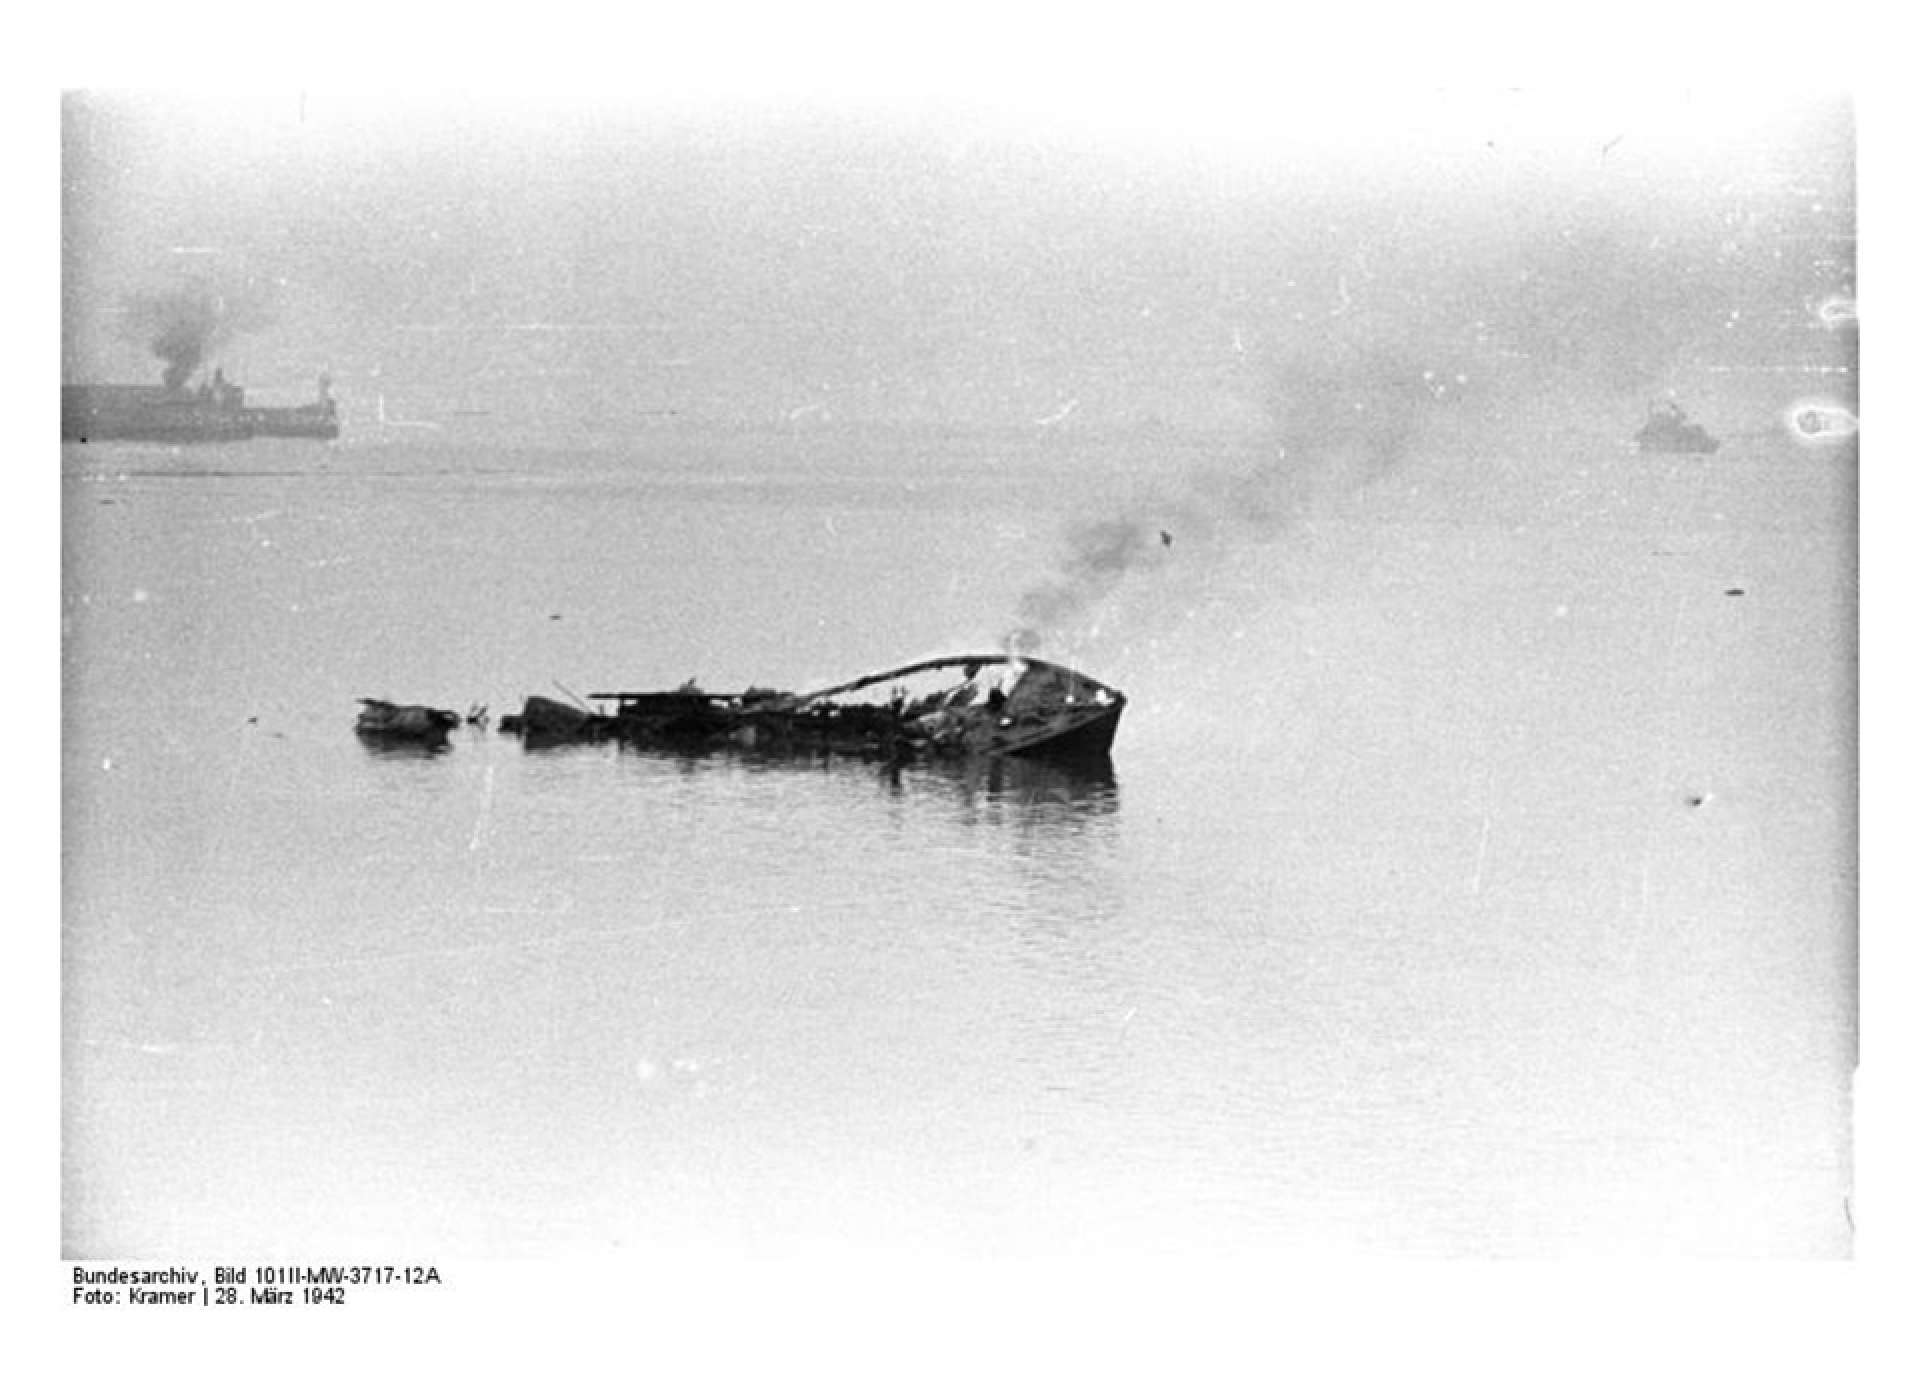
Of the six motor launches assigned to secure the pick-up point and evacuate the commando teams, all but one sank under fire or was reduced to flames prior to reaching their objective at the Old Mole pier. Securing that pier was essential for the Operation Chariot raiders to have any chance to make it home to England by boat, as planned. And without the motor launches any hope of evacuation was lost.
The Commando teams that destroyed the pump house and winding room joined in the battle over the exfiltration point at the Old Mole. But the well-armed German defenders had not been dislodged from their dual pillbox positions and the pier quickly became a killing zone as German forces concentrated fire on the attacking commandos.
Cut off from their naval evacuation route, the commandos fell back to Col. Newman’s command post. He assessed the desperate situation and the battered condition of his troops and briefly considered surrender, asking Major Copland who had arrived after his team successfully destroyed the northern pump house, “Shall we call it a day?” Copland’s entire team was wounded at that point, yet he replied without hesitation, “Certainly not Colonel. We’ll fight our way out.”’
True to form, Newman and his commandos improvised and sought to escape St. Nazaire on foot, continuing to attack targets of opportunity along the way. A moment of hesitation at a heavily defended bridge turned into a frontal assault when Newman surveyed the situation and barked, “Away you go lads!” Their efforts took them into the town where they engaged in close quarters fighting among the streets and buildings and scrambling along rooftops or over fences, gardens, and chicken coops in what would later be dubbed, “The St. Nazaire steeplechase.” Beyond the town lay the French countryside, 400 miles to the border with Spain and the hope of safe passage home to England.
By 0300, the few surviving motor launches were forced to withdraw, sensing that it was suicidal to attempt to reach the extraction point again, with so few surviving vessels and growing numbers of wounded sailors and damaged weapons. The surviving flotilla crept along in the dark and approached the open sea, hoping to avoid detection. But they were spotted by a group of five German torpedo boats and a new desperate battle ensued.
The flimsy British motor launches were no match for the combined firepower of the German torpedo boats and shore batteries. But the British gunboats fought back valiantly against those odds. Their grit and courage were exemplified by Able Seaman William Alfred Savage. Like Sgt. Durrant, Savage manned a fully exposed deck gun and returned fire emanating from a German shore battery. Under attack from multiple German positions and the newly engaged torpedo boats, Savage silenced the shore battery briefly but was eventually felled by multiple wounds when the battery came back online.
As dawn arrived, the fighting had subsided, and the surviving commandos went into hiding around St. Nazaire. They were exhausted and many were wounded. Their supplies and ammunition were depleted. They waited for discovery by fresh German search parties or for nightfall and another chance to escape to the countryside. Newman was with the largest of these groups, gathered in a basement in the town. The commandos remained silent but when a German grenade was dropped down the stairs but failed to detonate, the reality of their situation set in and Newman announced their surrender.
-
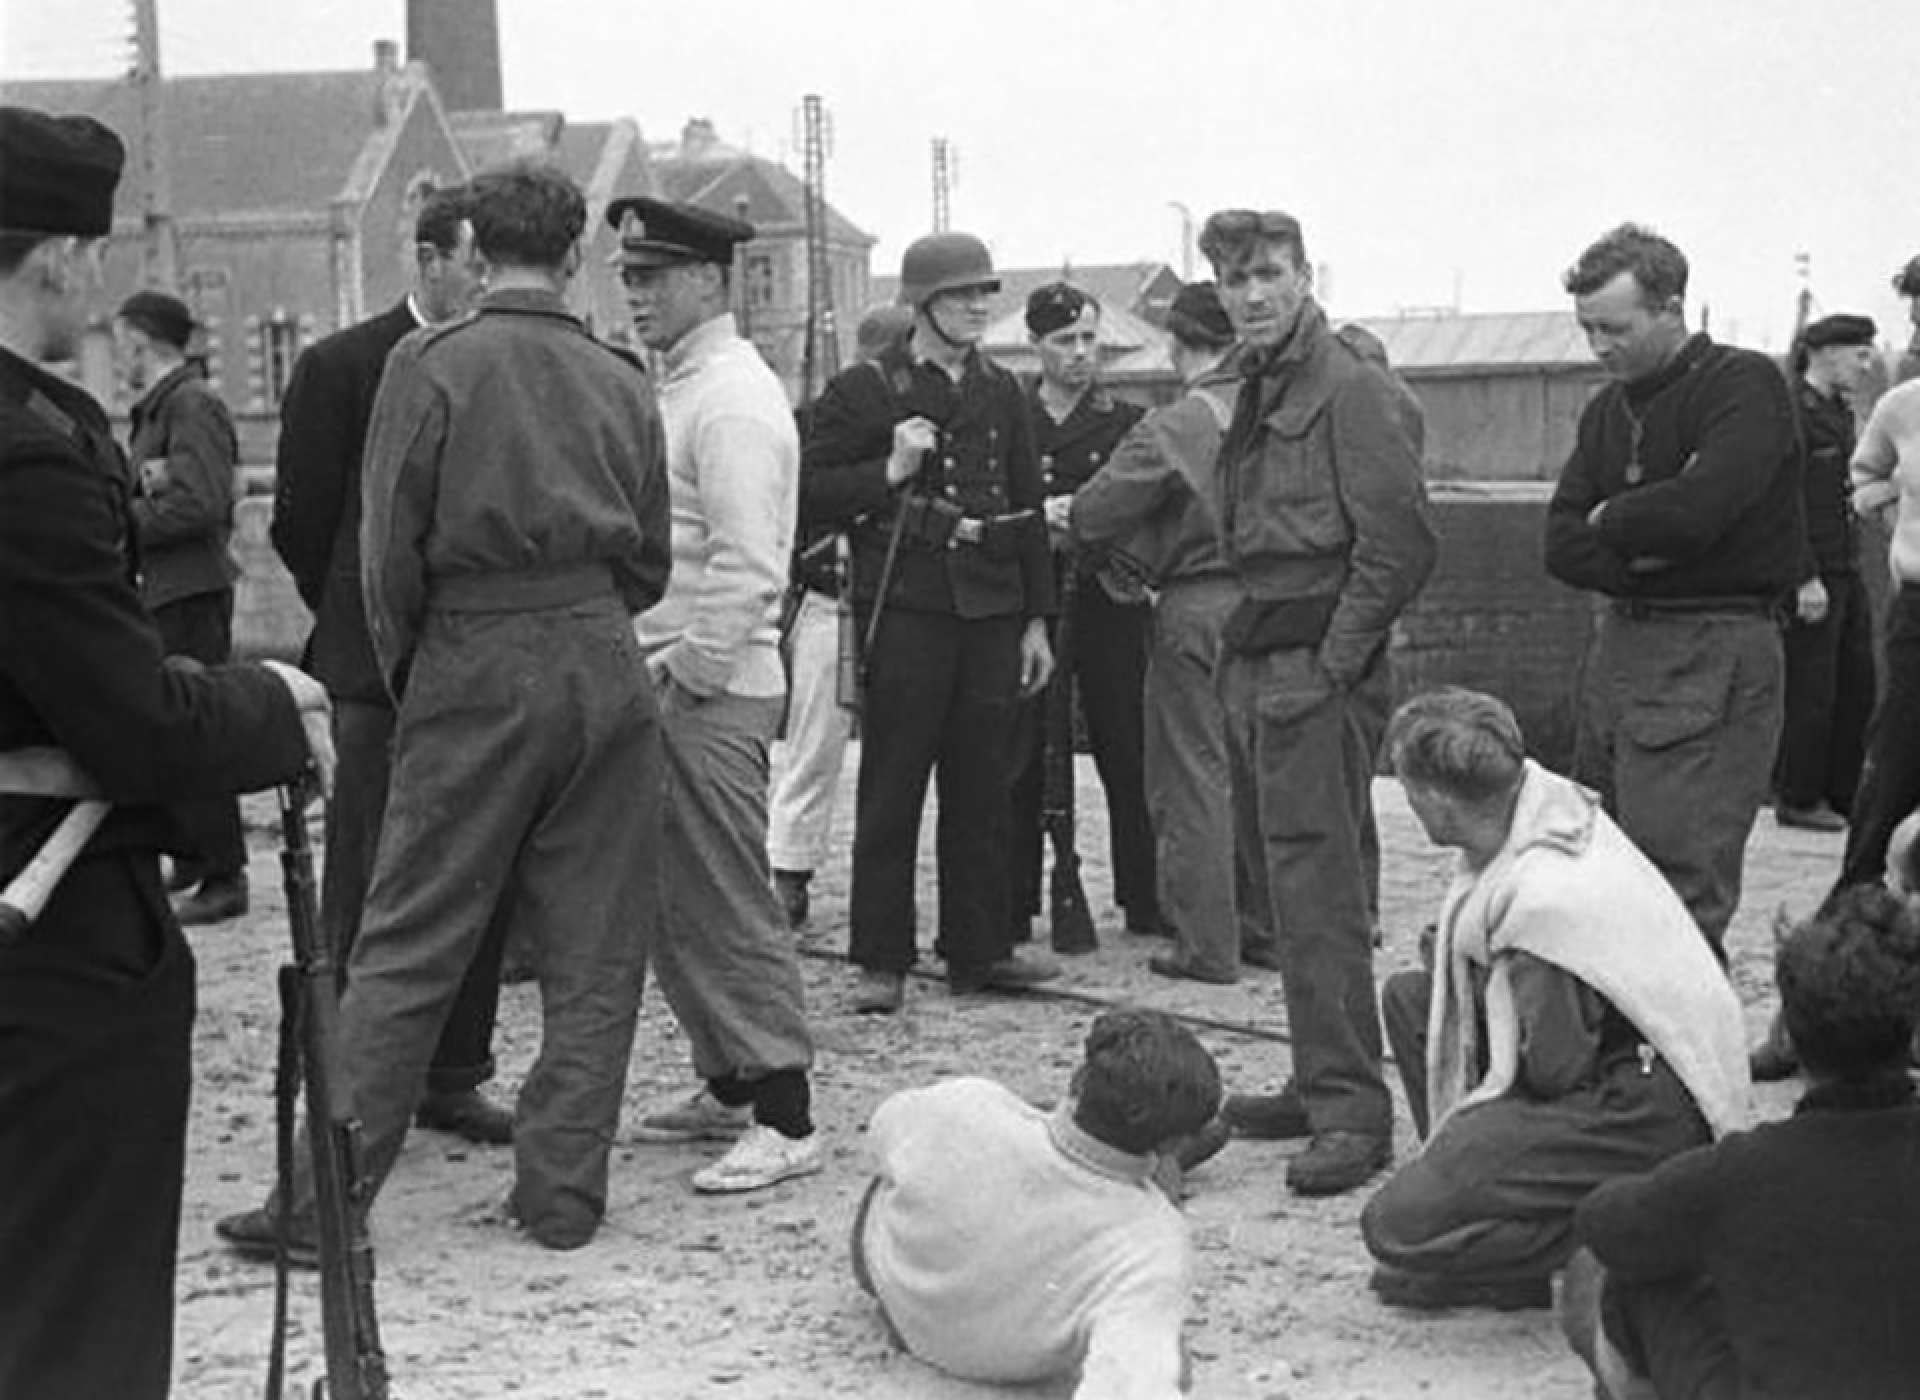
British sailors and commandos, now prisoners of war, under guard on the dock. Bundesarchiv, Bild 101II-MW-3720-17 / Kramer / CC-BY-SA 3.0
-
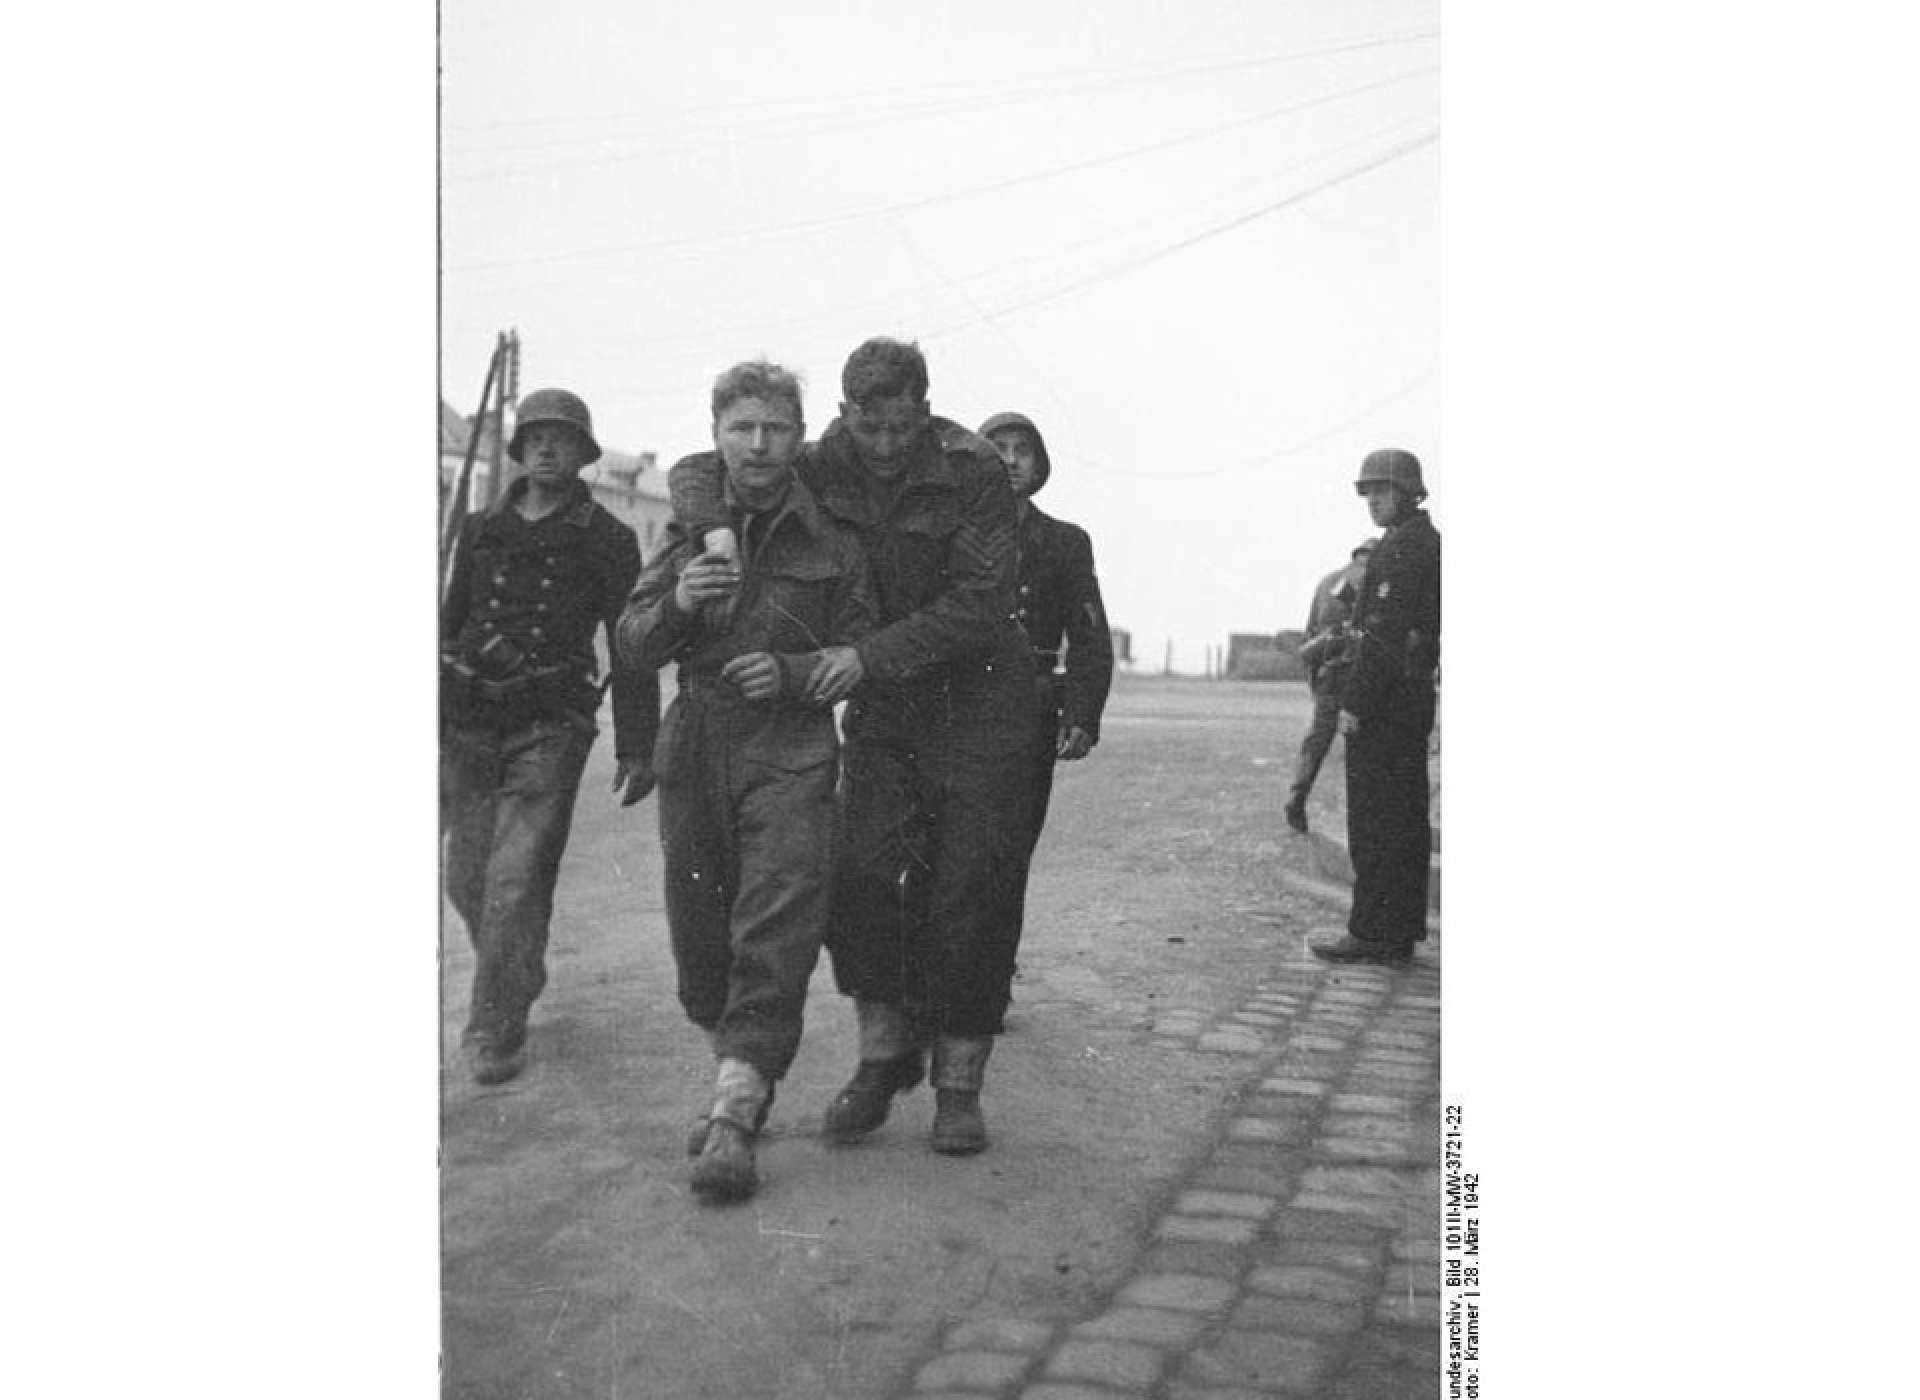
Many wounded commandos were taken prisoner by German forces. Bundesarchiv, Bild 101II-MW-3721-22 / Kramer / CC-BY-SA 3.0
As the Germans regrouped, the commandos waited for the massive depth charge loaded contraption buried in the Campbeltown hull to explode. The three pencil fuses that Tibbits had set should have triggered the explosion by 0900, but that hour came and went. With the harbor and town secure, the Germans had begun to relax, and interrogations commenced.
Lt. Commander Stephen Beattie, who had so deftly commanded Campbeltown through the muddy shoals of the estuary to its objective wedged atop the dry dock caisson, was eventually captured. He found himself being interrogated by a German officer late in the morning following the raid. Germans by the hundreds had begun to rummage through the Campbeltown wreckage, some even looking for souvenirs.
The interrogating officer chided Beattie for thinking that crashing a ship into such a formidable gate could have any lasting effect. As if on cue, Tibbits’ fuses went off and the interrogation room and the entire harbor shuddered as the 4.5 tons of explosives in Campbeltown’s hull exploded. Hundreds of Germans were killed instantly by the massive explosion and the damage inflicted on the St. Nazaire dry dock was so severe that it was not repaired until several years after the war.
The Campbeltown explosion threw St. Nazaire into a new state of alert. And late that evening, in a fitting end to the mission, two time-delay torpedoes exploded beside the gates to the harbor away from the dry dock and near the U-boat pens. A British motor torpedo launch had fired them during the initial attack. The unexpected explosion reignited panic among the Germans who feared a second attack. Reportedly, a number of French residents were killed by frightened German troops.
The human toll for the British raiders was staggering. Of the 611 who sailed into the Loire on March 28, 1942, 169 lost their lives and of those,105 were members of The Royal Navy and 64 were Commandos. Of the 232 who were captured, nearly half were wounded. Five commandos made their way out of St. Nazaire and into Spain and then on to British-held Gibraltar eventually to rejoin their units in England, each of which is a story in itself.
As befits an operation that would eventually bear the moniker “The Greatest Raid,” Operation Chariot produced an extraordinary list of awards for gallantry. Sgt. Durrant and Able Seaman Savage were awarded Victoria Crosses posthumously. Upon their return to England, the same high distinction was bestowed upon Commanders Ryder and Beattie and Lt. Col. Newman. No other operation has received so many Victoria Crosses. The raid on St. Nazaire garnered four Distinguished Service orders, 17 Distinguished Service Crosses, 11 Military Crosses, four Conspicuous Gallantry Medals, five Distinguished Conduct Medals, 24 Distinguished Service Medals, 15 Military Medals, and 51 men Mentioned in Dispatches.
Meet the Authors
Thurgood Marshall, Jr. has served in each branch of the federal government, including as the Assistant to the President and White House Cabinet Secretary to President Clinton and, prior to that, as Director of Legislative Affairs and Deputy Counsel to Vice President Gore. Mr. Marshall also held a position on the Senate leadership staff, served as counsel to the Senate Judiciary Committee, the Committee on Commerce, Science & Transportation, the Governmental Affairs Committee, and was appointed by President George W. Bush to membership on the US Postal Service board of governors. Mr. Marshall was also a partner at the law firm of Morgan Lewis where he advised clients engaged in public policy. He began his career as a law clerk for US District Judge Barrington D. Parker in the US District Court for DC. Mr. Marshall also serves on the boards of two publicly traded companies and The Third Way. He is a former board member of the Ford Foundation and the National Women’s Law Center, among others. Mr. Marshall is a nationally recognized attorney and has received several awards for his public service. He is a graduate of the University of Virginia School of Law.
Peter Goelz is senior vice president at O’Neill and Associates and offers decades of experience in national crisis communications and federal relations, with a specialty in aviation and transportation. He is regularly sought-after by national media as a commentator on aviation safety matters, appearing frequently on CNN, CBS Evening News, FOX News, MSNBC, and others. Most recently, Mr. Goelz worked for an international public relations firm where his clients included major airlines, aviation maintenance companies and leading transportation safety and security firms. Previously, Mr. Goelz served as managing director of the National Transportation Safety Board. He is widely hailed as one of the country’s most experienced coordinators in disaster situations.
Further Reading
Chant-Sempill, Stuart (1985), St. Nazaire Commando (Presidio)
Churchill, Winston (1950), The Second World War (Houghton Mifflin)
Clarkson, Jeremy & Pearson, Richard (2007), Documentary: The Greatest Raid Of All Time (BBC)
Cooksey Jon (2005) Commandos Operation Chariot The Raid On St. Nazaire (Pen & Sword)
Dorian, James (2006), Saint-Nazaire Operation Chariot 1942 (Pen & Sword)
Ford, Ken & Gerrand, Howard (2001), St. Nazaire 1942 (Osprey)
Ford, Ken ( 2004), St. Nazaire 1942 (Praeger)
Harding, Duncan (1977), Operation Chariot (Thunderchild)
Lyman, Robert (2013), Into The Jaws Of Death - The True Story of the Legendary Raid on Saint-Nazaire (Quercus)
Manchester, William (2013), The Last Lion: Winston Spencer Churchill Defender of the Realm (Bantam)
Stasi, Jean-Charles (2018), Operation Chariot The St. Nazaire Raid 1942 (Casemate)
www.commandoveterans.org/Chariot
www.combinedops.com/index.htm
www.operation-chariot.org/
Cite this article:
MLA Citation:
APA Citation:
Chicago Style Citation:

![Max Fuchs, New York City cantor, sings as Rabbi Sydney [sic] Lefkowitz, Richmond, VA, conducts the first Jewish services from Germany.](/sites/default/files/styles/max_650x650/public/2025-10/image1.jpg)